Tuesday, December 22, 2009

WHAT IS NORMAL???

Lately Little R has sure been difficult. He has been talking like a baby, yelling a ton, hitting, crying non stop,testing my patience constantly, and just down right being a STINKER.
I keep wondering,
"Is this Normal? Is this a phase he is going through?
What is going on with this little 3 year old? "


Have you ever wondered if what your TODDLER is doing is considered NORMAL?

Hopefully, I am not alone on this. Well I was put at ease at his check-up at the doctors office last week. I was given a sheet with NORMAL DEVELOPMENT for a 3 year old.
And I discovered that what little R was doing was NORMAL BEHAVIOR!!! (For the most part)

Here is a list of all of the different types of development that I found rather reassuring, and rather hilarious at the same time.

Physical Development:
*May stumble and fall often.
*Undresses self, but needs help with dressing.

Emotional Development:
*Cries and hits at times.
*Quickly switches from shyness to high spirits and back again.
*May want to be a baby at times.

Social Development:
*Seeks approval from adults.
****TESTS LIMITS CONSTANTLY.
*Shares and takes turns OCCASIONALLY.
*Quarrels with other children.

Mental Development:
*Has attention span of no more than a FEW minutes.

Written by Donna Warner Manczak, PhD, MPH and Robert Brayden, MD

Way to go little R, you are well on your way to be a NORMAL little 3 year old.


Proud mother moment!!!

Monday, December 7, 2009

Christmas Tree and Wreath

Happy Holidays

Are you feeling like your house is a little low on the holiday decoration side? Well here are two cute kid crafts that you can instantly hang up to add to your home holiday decor.

(They really turned out this cute,
and they were made by two toddler boys,
who knew boys could be so crafty???)


Christmas Tree

1-Find some green scrapbook paper
2-Cut out a pattern of a Christmas Tree
3- Cut out a yellow star for the top
4- Cut out circles or any other shape for the ornament.
5-Let your toddler glue on each piece wherever they see fit.

***I used wrapping paper that already had circles on it.
The paper was shimmery and added something fun.
We hung little R's tree on the back of our front door. He was so excited to hang it up himself.


Christmas Wreath

1-Cut the inside of a paper plate off, so you have a nice circle to work with.

2- Use some branches from your Christmas tree or nearby forest to use to glue to your wreath. This should not be too hard to find if you live in my neck of the woods. :)

3- Use Elmer's glue and let your toddler glue those branches on. This glue takes a while to dry but works really well to hold the pieces on to the paper plate.

4- Once your branches are dry, hot glue on a crafty bow.

5- Add a little Merry Christmas sign for some color, just glue it to the back of your wreath.

6- Hang it up on your toddlers door:)
Happy Holiday Crafting!

Tuesday, November 17, 2009

Band-Aid Art

Band-aids are the cure all at my house.
Even a cure for the hyper little toddler.


Let me explain. . .

BAND-AID ART

This is such a simple art project, because almost every home has band-aids of some sort and paper.

Here are the instructions:

1-Toddler picks out their favorite color paper
2-Adult grabs a couple of different types of band-aids
3-Have a little lesson about how to open up a band-aid
4-Let your toddler open up the band-aids all by themselves.
5-Stick the band-aids on the paper
6-Use a glue stick to stick down the wrappers of the band-aids


***Extra Bonus Points: Talk about the letter Bb and glue some Bb's on to the page or use some Bb magnets to hang it up on the fridge!

Sorting some more

Mega Blocks:
A favorite at our house. We love to build towers to the ceiling, and knock them over, but lately Little R has been begging me to let him
SORT the MEGA BLOCKS.

Little R helped me make our sorting cards for his buckets and bins.
We used construction paper glued onto regular white card-stock.
Then we decided which bucket or container should go with what color.
We had to dig a little bit to find more containers.
Another day, while I was doing laundry,
we used our empty laundry baskets and it worked really well.

Sorting the blocks is a great way to get a little bit extra play time out of your Mega Blocks. After Little R is tired of playing with the blocks, I pull out the buckets and sorting cards and let him play for another 30 minutes. More time for me to clean or have one on one time with Madi. Plus, I know that he is glued to this project for a while and is learning at the same time!

SIMPLE CLEAN UP STRATEGY!!!After a little bit of sorting the buckets and bins got full. He simply emptied them into the Mega Block Container. Hooray, no complaining about cleaning up and the best part is you don't have to help pick up a thousand blocks.
Critical Thinking
This little car had two colors. Little R was very confused as to which container he should put this one in. He decided after a while to put it in the blue bucket, because "the wheels are blue".
Good thinking Little R.

Have fun sorting those blocks!

Friday, November 6, 2009

SORTING: Words Their Way

I love the program Words their Way. I used to use this spelling program when I taught second grade. Now, I just started using this same program with my little ones. If you have never sorted with your toddler, there is never a better time to start than now. Words Their way was written by Donald R. Bear, Marcia Invernizzi, Shande Templeton, and Francine Johnston. I love their way of thinking. It just fits the way that we learn the best. How does it help toddlers? In the third edition of their book it states, " The human mind appears to work by using a compare-and-contrast categorization system to develop concepts and attributes. The sorting activites build on and reinforce this natural tendency." (Page 102) Sorting also builds vocabulary skills. Toddlers learn names of pictures, items, and categories. Great for organizational skills too.

As little R and I sort, we talk a lot. I ask him questions like, "Why did you put that there? or What made you think that? Where else could we put that?"
Little R has really expanded his vocabulary just by simply sorting things.

What do we sort? You might ask.
We sort just about everything.

Each week I am going to post at least one sort that we have done. I try to do one everyday. They take about 1-2 minutes and any mother or caregiver can do it.
NOT A BIT HARD.

Here was a sort that we did just this week:
SORTING HALLOWEEN CANDY
Step #1: Dump out Halloween Candy

Step #2: Talk to your toddler about making piles, groups, or rows. Tell them that you are going to sort the candy today. Little R talked about finding "matches." Make sure that the sorting is done by your toddler:)
Step #3 Keep sorting and ask questions to your toddler to get them using vocabulary. What do you call this pile? Why did you put that there? etc.
Step #4 Let that toddler of yours have a treat! I couldn't tell him no, so I let him pick one to eat, after he told me why he picked that one. "Because it is skinny and long!"
Want another fun idea to do with that Halloween Candy?
Click here to make some fun candy art.

Monday, November 2, 2009

Crayola Alphabet Activity Posters


Want a fun way to practice writing those letters? I bought this crayola pad at STAPLES. Used our rewards points, and got them for FREE. Little R does one sheet a week. We focus on the same letter that he is doing in preschool. He loves doing these. We first start off, talking about the letter. Then I let him trace the letters on the side. Next we practice those coloring skills by coloring the pictures on the other side. Finally we end by circling all of the letters that we know on the page. These are such a must have if you have a preschooler. We started in August when little R was 2 years and 9 months old. I wish I would have started doing these sooner.

Friday, October 23, 2009

Leaf Crafts

These leaf crafts came from Magical Moments Preschool. You can go to her website, from the side of my blog or click here.

Thanks Teacher Jenny

We changed up your ideas a titch and added some songs. . .

Here you go!
Enjoy


Leaf Wreath
#1- Went on a leaf hunt.
#2- Cut out a circle from a paper plate.
#3- Let Little R glue on the leafs however he wanted.
#4- Picked out a saying together.
#5- Printed out "Happy Thanksgiving"
#6- Little R chose the color of ribbon
#7- I hot glued on the ribbon

Plan on Hanging it on our door for Thanksgiving. I thought this turned out so cute. Thanks for the Idea Jen.


Leaf Creatures
#1- Go on a leaf hunt
#2-Glue on some eyes with Elmer's Glue
#3- Hot glue craft stick on the back or Elmer's Glue would work too. We just wanted to use them right away.
#4-Sing some fun songs with the LEAF sticks.


Here are some fun songs to use your leaf sticks with to bring in AUTUMN. . .

" Autumn Leaves" (London Bridge)

Autumn leaves are falling down, falling down, falling down.( arms up high like a tree then lower as song goes on )
Autumn leaves are falling down, (lower your voice)
Down to the ground (squat down and continue with this finger play)

"The Leaves are Falling Down"
(tune of The Farmer in the Dell)

The leaves are falling down
Red, yellow, green and brown
The leaves are falling down

Five Little Leaves
(Five Little Ducks)

Five little leaves so bright and gay.
Were dancing about on a tree one day.
The wind came blowing through the town,
And one little leave came tumbling down.

Four little leaves... Three little leaves... Two little leaves... One little leaf so bright and gay Was dancing about on a tree one day The wind came blowing through the town And one little leaf came tumbling down.


Circle Crayons

Melissa this one is for you!!!

First: You take off the paper on those old crayons that you don't really like to use. Besides I am sure that you just bought new ones that were super cheap from all of those back to school sales. This took the most time, Little R was totally into this activity, even though he couldn't do it very well. It was me who took most of the paper off, but I was impressed that he stood there and watched while cheering for me!!!


Second: You let the toddler sort the crayons after the paper has been taken off. It was fun to watch Little R sort the crayons. He was so precise and would talk out his reasoning.


Third:Bake the crayons!!! Make sure that if you do this you spray the muffin tins with some sort of cooking spray. Otherwise you will have a mess. You bake them on 425 for about 5 or ten minutes. This is what they look like when you get them out of the oven. I don't really know how long it took to cool. We took them out and headed to the park. Then when we came back they were ready to take out and color with.

Fourth: Take them out of the pan and COLOR!!!! Just a tip: The ones with the most crayons turned out the best. The thin ones broke really easy.


Total Little R time: 3 hours
From start, to park, to finish

It was a little bit messy, but worth every bit of fun!!!


Thanks for listening to a mother, who thought this idea was fun and worth the time to see her 2 year old stinker, smile.

Let me know how they work Melissa

Sunday, October 18, 2009

Get that baby COLORING


This was so much fun. While little R was taking a nap M and I had some fun the other day.

1- Tape down a piece of white paper
2- Put some crayons in babies hands
3- Let them have some fun.

I thought this was a clever idea to tape down the paper. I got this idea from a book called, "Games Babies Play" Little M loved being a big girl today and spending one on one time with me.

We used our circle crayons that we made a couple of months ago. They were perfect, because no matter how she touched the paper, she colored.

Wednesday, October 14, 2009

EGG carton Caterpillar


Little R has been obsessed with eggs lately so here is a fun craft that anyone can make, because almost everyone has eggs and egg containers. Add a string for some fun. He had a blast pulling "Baby Koleb" around all day long. He even came with us to Target.

Wednesday, October 7, 2009

Pack O' Fun


Ran into this magazine at the Library. Some of the ideas are a little bit cheezy, but I got some cute ideas for fall. Here they are if you can see them:) We will be making some of them, to share.

Friday, October 2, 2009

General Conference Quiet Activity #4

PUMPKIN PIE PLAY-DOUGH

I had a recipe for this, but I lost it. I googled it and here is what I found. This makes so much. I thought this would be a quiet activity for Little R to play with during Conference. Hopefully it will keep him occupied for a 1/2 hour or two:)

Thanks to Like Merchant Ships Blog for the Recipe. Copied from her site.

5 1\2 Cups Flour
2 Cups Salt
8 teaspoons Cream of Tartar
3\4 Cup Oil
1 Container (1 1\2 ounces) Pumpkin Pie Spice
4 Cups Water
(I omitted the yellow and red food coloring.)

The original instructions were unclear. I combined all the ingredients (more or less) in a medium saucepan, stirring at medium heat. The mixture will begin to clump. Keep stirring.

Remove from heat when the mixture changes from a batter-with-lumps consistency to something that looks like brown sugar and/or peanut butter. Pour onto floured surface to cool. Ours was still sticky in places, but kneading with additional flour evened the texture.

The recipe makes enough to fill a 1/2 gallon ice cream carton (or its Tupperware equivalent.)

IT MAKES YOUR HOUSE SMELL SOOOOOOOO Good!!!!

General Conference Quiet Activity #3


Temple Jar

I don't know about your toddler, but my little guy loves the temple. He gets so excited every time you mention it, sing about it, or show him a picture of one. So here is Activity #3

What you need:
* Canning jar of some type.
* popsicle sticks
* pictures of the apostles, and President Monson
* favorite temple pictures
* packing tape


How you do it:

1- Cut out pictures of Apostles and President Monson (I found these in the last conference edition, easy and cheap)
2- Mount them on cardstock
3- Tape them to popsicle sticks with clear packing tape
4- Mount pictures of the temple to your jar.

How to play the game:

Hand your toddler the popsicle stick that has the picture of the speaker. Have them listen to the speaker to hear the word temple. If the speaker says the word
"TEMPLE"
their picture can go in the jar.

I thought that I would at least try this with the First Presidency. Then I know that Little R is listening to some of Conference.

General Conference Quiet Activity #2


Get to know President Thomas S. Monson
a little bit better, by making this Prophet box. It was super easy, I hope that little R enjoys it.

What you need:

*Box of some sort, I used a 50cent pencil box. But you could just use a shoe box.
*Facts about President Monson. (go to lds.org from here, then click on his picture)
*Clipart to go along with the facts

How you do it:

1- Print off the fact sheet about President Monson
2- Find clipart to go along with the facts you want your kids to learn
3- Cut and past clipart
4- Make a brief sentence or two about the fact for the back of your card.
5- Laminate for durability

****If I was thinking, I would have made two sets of cards for a MEMORY game.

Little R loves to put things in boxes, and look at pictures, so I thought that he might like this activity. PS I also got some of my facts from the church DVD, "On The Lord's Errand." This is a new DVD about Prophet Monson.

I tried to upload my images and other document, but it failed today. Maybe tomorrow.

Wednesday, September 30, 2009

General Conference Quiet Activity #1

I have been thinking a lot about what I can do for Little R to entertain him during Conference. Most of the things that I find on the internet are for older kids.

So here is one idea that I came up with. . .

"SEW" Fun


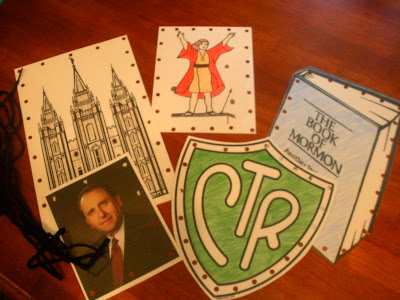
I remember these from when I was a little girl. They have these in various shapes. But I thought why not make some Church related things? "Sew" here is how you make them. . .

What you need:
* Favorite church shapes (I found most of mine on freeldsart.com under the word clipart) I used the Book of Mormon shape, CTR logo, Salt Lake Temple from here. The others I just used Google images.
* Cardstock
* colored pencils, markers, or crayons
* laminator
* Hole punch
* Shoe laces

How you do it:
1- Find your shapes
2- Print them out
3- Color them to your desire
4- Get them laminated
5- Punch holes around them about 1 1/2 inches apart
6- Buy some shoelaces


***You can also use yarn if you would like instead of shoelaces, just tape the ends for support.

MORE CONFERENCE IDEAS TOMORROW

Saturday, September 26, 2009

Glowing in the Dark


Grandma and Grandpa came for a visit and brought us some fun entertaining things to do. . .

Glow Sticks
What a fun and cheap way to entertain your toddler. Little R played with these for about an hour and a half. Not to mention all of the adults in the room too. You can usually find these all the time at Michael's 15 for $1.00, you can also find them at Target for $1.00 in their cheap dollar bins at the front of the store. (Now is the time to stock up on these, because you can find them almost anywhere because of the Halloween Season)

What you need:
*Pack of glow sticks with connectors
*Dark room
*Camera
*Maybe some fun music to twirl to and dance.

How to do it:
#1-Put your glow sticks together in the pattern that you want
#2-Turn out the lights
#3-Dance to the music and twirl glow sticks
#4-Laugh lots and remember to take turns:)

****Taking pictures of this activity was so much fun. It was fun to see the difference with and without the flash on.

Thursday, September 24, 2009

Stick Art


Does your little boy love sticks too?
Little R is in love with sticks. It seems like wherever we go, he picks one up and won't let it go. So, we decided to go on a stick hunt. While we could have picked up lots of different sticks, we focused on picking up small sticks. Then we went home and made some stick art. . .

What you Need:

* Large Zip-loc bag
* Small to Medium sized sticks (Had to fit in the bag)
* Elmer's glue
* Colored Paper

How to do it:
1- Collect your sticks
2-Pick out your colored paper
3-Squeeze on Elmer's Glue in Design that you want
4-Put your collected sticks on your glue
5-Wait for your masterpiece to dry

Twist on the Project:
***Glue the sticks on your paper to make your child's name:) Always fun to practice the letters in your name.